Build, Reuse, and Personalize Design Templates for Print Products in WooCommerce
Learn how to create, manage, and personalize print-ready design templates in Printcart for WooCommerce. This guide covers safe zones, dynamic fields, mobile UX, reusable layouts, and production-safe settings for scalable Web2Print operations.
- By Netbase
- 8 views
- 0 reply

Netbase
This quote has stayed with me throughout my journey—especially as I built Printcart from the ground up "What doesn’t kill you makes you stronger."
This quote has stayed with me throughout my journey—especially as I built Printcart from the ground up.
I'm David, CEO of Printcart, a division of Netbase JSC, and I’ve dedicated the past 15 years to transforming the Web-to-Print and Print-on-Demand (POD) industry. My goal from the beginning has been clear: to help printing businesses around the world scale through automation, personalization, and smart technology.
Before Printcart, I spent years consulting and launching web-to-print platforms for printers of all sizes—from local shops to global enterprises. That experience taught me to ask the right questions:
How can we reduce manual steps for printers and let them focus on growth?
What tools do customers need to personalize and place their orders effortlessly?
How can we make the Web2Print journey smoother, faster, and more profitable?
At Printcart, we combine AI, cloud-based automation, and a plug-and-play customization engine to bring that vision to life. But more than features, we care about outcomes—helping our clients deliver better user experiences, close more deals, and scale sustainably.
I’m always open to new ideas and feedback from the community. If you’re exploring how to evolve your print business or launch a new eCommerce venture with Web2Print capabilities, feel free to connect directly.
Let’s talk growth.
? Email: project@printcart.com
? Website: https://printcart.com ...
Related Post
Introduction: What Is a Designer-to-Printer Marketplace? Why the Teespring Business Model Works A designer-to-printer marketplace is a platform where creatives can upload artwork and sell it on print products (like t-shirts,...
Introduction to Online Designer UX for Print Stores What is an online product designer in Web2Print? An online product designer is a web-based customization interface that allows customers to personalize print...
The Art of Personalization Capturing the Essence of Your Love Story: A Personalized Journey Finding unique and meaningful gifts can be challenging, especially when trying to capture personal love stories...
Other Usefull Contents
You can see many success stories from our customers, and you may be one of them in the future







Why Design Templates Matter in Web2Print Workflow
For print shop owners scaling product catalogs across packaging, signage, apparel, and business stationery—design templates are a game-changer.
Instead of recreating print zones from scratch, you can apply standardized editable areas, safe zones, and logic across multiple SKUs. This reduces human error, saves setup time, and gives your customers a consistent experience.
The Problem: Inconsistent Print Zones = Inconsistent Output
Manual setup across 20 product variations often leads to:
Different DPI values and image resolution
Misaligned safe zones or cut lines
Extra support time when files go wrong
When your Web2Print store supports hundreds of SKUs, setting up templates ensures:
Consistent design boundaries
Faster onboarding for new products
Clean handoff to production
Benefits of Reusable Design Templates
Standardize print specs like 300 DPI, safe margins, and layout
Share layout logic across business cards, flyers, boxes, and labels
Reduce friction for internal teams and external designers
Speed up product publishing by reusing validated zones
Example Use Cases
Create one 3.5 x 2 inch business card layout and assign it to 10 different styles
Set up front/back flyer templates once and reuse across sizes
Configure custom box dielines with locked design boundaries for packaging
In the next section, we’ll walk through how to set up your first template using the Printcart Template Tag system.
Learn more about Web2Print layout automation
Getting Started: Creating Print-Ready Templates in WordPress
To begin using templates in your print store, you’ll first define a design area—then save it for reuse across products. This section shows how.
Step-by-Step: Define Your First Template in Printcart
Go to WooCommerce > Products and choose a product (e.g., Business Card)
Scroll down to PCDesigner Settings and go to the Design Editor Settings tab
Define the design area: width, height, DPI, margins
Toggle "Use Global Template Area"
Click "Create Template" to launch the editor
Using the Template Editor Interface
Assign a template name (e.g., "Card_US_3.5x2")
Choose default thumbnail or upload custom preview
Tag by category (e.g., Label, Sticker, Shirt)
Set primary colors for template filtering
Where Templates Are Managed
All templates are stored under PC Designer > Template Tags
You can edit, delete, or duplicate templates from the dashboard
Templates are reusable across any product using the same size specs
Overlay and Alignment Tools
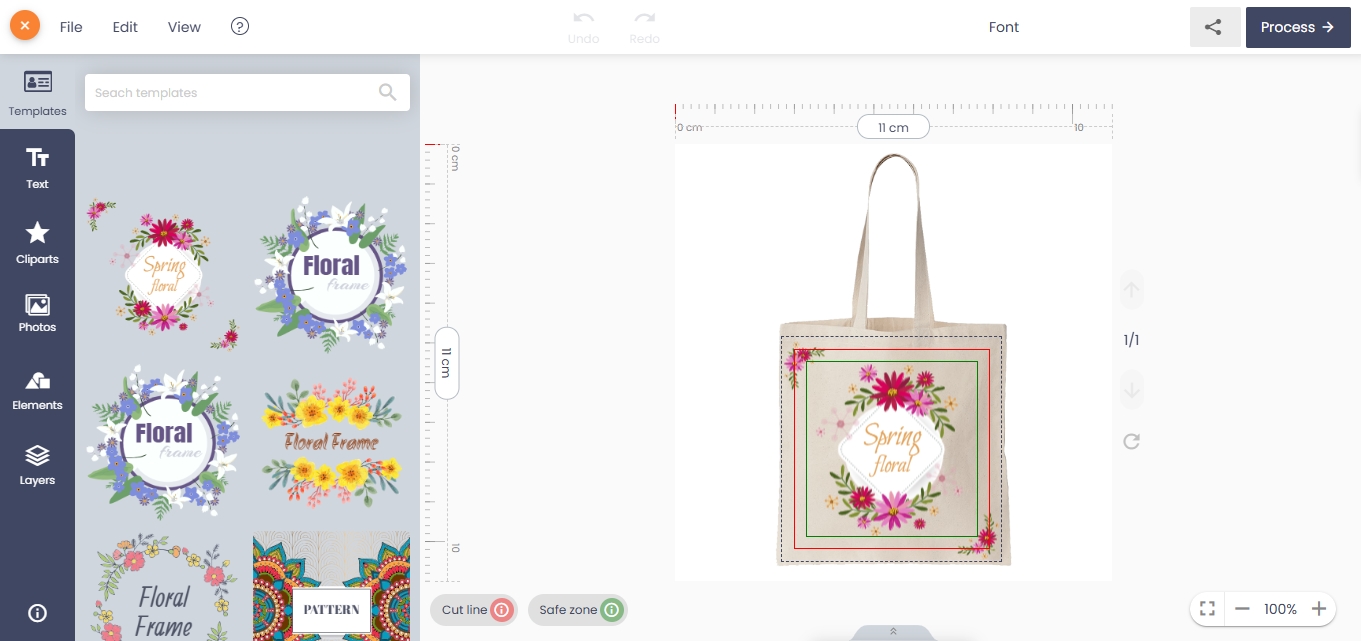
Use the red (cut line), black (trim), and green (safe zone) visual guides
Test preview in frontend to ensure correct scaling
Add optional guidelines for fold/spine/corners in packaging designs
In the next section, we’ll show how to apply your saved templates to multiple WooCommerce products for rapid store scaling.
See full template editor walkthrough
How to Reuse Templates Across Print Products
Once you've created a design template in Printcart, the real power comes from reusing it—across dozens or hundreds of products—without having to manually reset print zones, DPI, or layout logic.
This is especially useful for businesses that offer variations of similar items (e.g., business cards with different finishes, posters in different themes, product packaging across sizes).
Step-by-Step: Apply a Saved Template to Any Product
Navigate to WooCommerce > Products and select an existing or new item
Scroll to PCDesigner Settings > Design Editor Settings
Toggle "Use Global Template Area"
Choose your saved template from the dropdown list
Save and preview the product frontend to confirm design area is applied
What Gets Reused
When applying a template, the following elements are reused:
Editable design area dimensions (width, height)
Trim, bleed, and safe zone overlay guides
Locked or flexible zones defined in the template
Primary layout logic (e.g., text zone alignment)
This drastically reduces setup friction and ensures customers interact with a familiar and consistent editing interface.
Ideal Use Cases for Template Reuse
Franchise business cards with different names but same layout
Event flyers across campaigns or regions
Product boxes for the same product family with size variants
Custom labels reused across flavors, scents, or styles
Managing Templates for Scaling
Use clear naming conventions like
Poster_A3_BleedSafe300dpiSort templates in PC Designer > Template Tags by product type or tag
Combine with Template Fields (covered next) for personalization at scale
In the next section, we’ll dive into how to add Template Fields—like name, phone number, or logo placeholders—to personalize each template for your customers.
Learn about template tagging and assignments
Adding Personalization with Template Fields
For many print products—like name badges, business cards, and product labels—static templates aren't enough. Customers want to insert their own name, phone number, job title, or logo. That's where Template Fields come in.
Template Fields are dynamic placeholders you embed in a template (e.g.
},}) that become editable input fields in the design editor.Step-by-Step: How to Add Template Fields in Printcart
Go to PC Designer > Template Fields
Click "Add Field"
Choose field type: Text or Image
Give it a name (e.g., "CustomerName") and tag (
})Configure options (editable, required, default value)
Insert a text box or image in your design template using the same tag (e.g.,
})Once saved, any product using that template will show input fields in the editor.
Types of Fields You Can Use
Text Fields – Customer name, ID number, address, title
Image Fields – Logo, photo, product image
Dropdown/Pre-fill – Static options (Premium feature)
Real-World Use Cases
? Employee ID cards – with name, photo, position
? Business cards – editable contact info for franchises
? Custom packaging – include batch code, flavor, or QR
?️ Event badges or passes – assign barcode + name to each attendee
Advanced Settings and Best Practices
Set fallback/default values (e.g. "Your Name") for each field
Disable editability if a field must remain locked (like a product logo)
Use spacing and font constraints in templates to keep input clean
Show field labels clearly in the sidebar of the design tool
FAQs About Template Fields
Will customers see code like
}? No—only editable fieldsCan I hide certain fields? Yes—use visibility settings per product
Can I use Template Fields in Upload-only mode? No—they work only in Custom Design mode
Can I translate field labels? Yes—via WPML, Loco Translate, or Custom Language
Are advanced fields part of all plans? Basic text/image fields are free; advanced logic requires Premium
In the next section, we’ll explore how to prevent print mistakes by enabling real-time safe zone previews and validation guides.
Full guide on Template Fields and personalization
Real-Time Safe Zone Previews and Cut Line Guides
Even with the best design tools, print mistakes can still happen—especially when users stretch text too close to the edge or ignore margins. That’s why enabling safe zone overlays and cut line guides is a must-have for any Web2Print store.
These visual guides help customers understand how close they can place logos, text, and borders without risking trimming or printing errors.
Key Definitions for Print Layouts
Bleed Area – Extends beyond the trim line; backgrounds and images should fill this to avoid white edges.
Trim Line – Final product dimensions after cutting.
Safe Zone – All critical elements (text, logos) should remain inside this area.
How to Enable Safe Zone Guides in Printcart
Go to PC Designer > Settings > Design Tool
Enable:
"Show Safe Zone"
"Show Trim Line"
"Show Bleed Area"
Customize each zone’s color and label for clarity
Click Save Settings
Preview a product template to confirm guide visibility
Enhancing UX with Validation Alerts
Combine guides with Printcart's smart warning system to:
Alert users if text/images are outside the safe zone
Prevent cart submission if layout breaks critical margins (optional)
Warn users about low-DPI files in addition to layout issues
Best Practices for Safe Zone UX
Use short tooltip text near overlays: "Keep text inside this box to avoid cut-off."
Avoid too many lines/colors that overwhelm the layout
Test across device sizes to ensure visibility on mobile
Include a preview thumbnail with guides ON for customer assurance
FAQs About Layout Validation
Can I change guide colors? Yes, under Design Tool > Guide Colors
Can I require customers to stay inside the safe zone? You can warn them, or block checkout with custom validation (Premium)
Are safe zones required for every product? Strongly recommended for all trimmed print formats (cards, flyers, labels)
Can I show a legend or explanation? Yes—use editor tooltips or a floating helper box
In the next section, we’ll look at how to set up the right combination of design modes and layout logic using Online Designer vs Upload workflows.
Safe Zone and Trim Line Setup Guide
Setup Combinations: Online Designer vs Upload-Only Mode
Different customers have different needs. Some want a full design editor experience, others prefer to upload their own finished artwork. That’s why Printcart allows you to configure products in three distinct modes:
Online Designer (Custom Design) – Full editor for creating or editing layouts on screen
Upload Design – Users upload PDF, PNG, AI, or SVG files directly
Upload Without Design – Simplified upload flow without entering the editor
Where to Configure Design Modes
Go to WooCommerce > Products > Edit
Scroll to PCDesigner Settings
Enable one or more of the following:
Enable Design
Enable Upload Design
Enable Upload Without Design
Save and preview the frontend to confirm design/start buttons are visible
Matching the Right Mode to the Right Product
UX Considerations by Mode
Custom Design: Requires careful safe zone setup, preloading templates, and device testing
Upload Design: Ensure file types, DPI, and max upload size are set properly
Upload Without Design: Best for fast reorder or simple print jobs—add a tooltip like "Upload print-ready file"
Tips for Combining Modes
Label the buttons clearly: "Start from Template" vs "Upload Your File"
Only offer Online Designer where layout interaction is useful (not for postcards with fixed art)
Test the default tab shown to users—Upload or Design—based on product use case
In the next section, we’ll walk through how to design a cleaner template UX and UI with smart field labels, layout previews, and user-friendly defaults.
Guide to Choosing the Right Product Design Mode
Best Practices for Template UX and UI
Even the most powerful design template setup can fail if the user experience is confusing. In Web2Print, your customers may include non-designers, franchise teams, or corporate buyers—all of whom expect clarity, ease of use, and visual feedback.
Here are the key UX–UI principles for making your templates work at scale.
Name Templates with Clear, Recognizable Labels
Use naming patterns like:
Card_3.5x2_US,Label_50mm,Box_Medium_FrontBackAdd internal notes in the template manager describing bleed, trim, and usage scope
Group templates by tag (e.g., Packaging, Apparel, Events) in Template Tags
Design a Visual Hierarchy Inside the Editor
Highlight starting fields like Name or Logo with bold placement
Keep extra elements (e.g., decorative lines or optional fields) in subdued color layers
Limit font choices to branded or print-safe fonts only
Use Field Labels, Placeholders, and Preview Thumbnails
Add placeholders like "Enter Name Here" inside text fields
Show field label in the design sidebar for clarity
Use a default thumbnail for the template preview so customers instantly recognize layout type
Limit Complexity Where Possible
Avoid giving users control over advanced features (like adding new layers or uploading fonts)
Use locked zones when printing must adhere to strict layout (e.g., packaging, safety signage)
Hide unused tabs in the designer layout using PC Designer > Layout Settings
Optimize for Mobile First
Test your templates at 375px and 414px screen widths
Enlarge tap zones for Template Fields (e.g., image upload, name entry)
Collapse long text fields or dropdowns to accordion menus
Enable Guided Mode for Non-Designers
Pre-fill fields with instructional text
Use step-by-step tabs (e.g., Step 1: Upload Logo, Step 2: Edit Name, Step 3: Preview & Confirm)
Add hover tooltips to icons like Save, Reset, or Next
In the next section, we’ll wrap up with frequently asked questions and troubleshooting tips about managing templates in a growing print catalog.
Customizing UX in the Printcart Designer
Common FAQs for Template Setup and Management
Even with a solid understanding of template setup, print store owners and teams often run into questions about behavior, compatibility, and management. Here’s a breakdown of the most common issues and how to resolve them.
Will changing a template affect existing products?
No. If a template is already applied to a product, edits made in Template Tags will not affect that product unless you manually reassign or update the template. This allows safe version control across multiple products.
Can I export and import templates?
Yes. Use the Export Config tool under PC Designer > Tools. This allows you to:
Backup template definitions
Migrate templates between environments
Share template layouts across multisite stores
How do I preview a template before going live?
Assign the template to a test product (or duplicate an existing one) and preview the design editor from the frontend. You’ll see real-time safe zones, field positions, and layout scale.
Can templates support multi-side designs (e.g., front/back)?
Absolutely. You can create multiple design sides in the same template. Use clear naming like "Front – 3.5x2" and "Back – Logo Panel" to distinguish them.
What’s the difference between Template Tags and Template Fields?
Template Tags define the layout structure and design zones.
Template Fields inject dynamic content like Name, Phone, or Logo into specific areas.
They work best together for personalized templates.
Can I delete a template that’s in use?
Technically yes, but it’s not recommended. Doing so will remove the design area from any assigned products. Always double-check associations in PC Designer > Template Tags.
What if my design zones are misaligned on mobile?
Check the DPI and canvas dimensions under your template settings. Also test preview scaling at 375px and 768px widths to ensure mobile compatibility.
Can Printcart support help with template setup?
Yes. If you need advanced logic, batch template import, or rule-based safe zone enforcement, contact Printcart Support for professional assistance.
In the final section, we’ll provide a complete checklist and CTA to optimize your print store template flow from design to delivery.
Visit the Template FAQ Hub
Final Checklist for Template Success in Your Print Store
Setting up templates correctly can streamline your entire Web2Print operation. Use this checklist to ensure everything from setup to UX is optimized—and your customers experience fewer errors and more satisfaction.
✅ Template Setup Essentials
Created templates with accurate DPI, width, and height
Defined safe zones, trim lines, and bleed areas
Enabled guide overlays for visual clarity in the editor
Saved and tested each template on a sample product
✅ Template Reuse & Organization
Applied global templates to similar product types (e.g., cards, flyers)
Named templates using consistent, recognizable labels
Categorized templates using Template Tags for easier filtering
✅ Personalization with Template Fields
Added relevant Template Fields (e.g., Name, Logo, Email)
Verified placeholder tags (e.g.,
}) work inside the layoutConfigured field settings for default values, lockability, and editability
✅ Mobile + UX Optimization
Tested template layouts at 375px and 768px widths
Enlarged tap targets for Template Field entry
Simplified the editor layout using guided tabs or steps
✅ Print Protection
Enabled smart warnings for design outside safe zones
Validated DPI requirements for image uploads
Provided tooltips and helper messages inside the design editor
✅ Admin Tools and Maintenance
Used Export Config to back up or transfer templates
Previewed templates before launch
Scheduled quarterly audits of template performance and usage
Ready to Scale Your Web2Print Store?
Whether you’re launching new SKUs, onboarding franchise buyers, or personalizing business collateral in bulk—design templates are the scalable backbone of a streamlined operation.
Need help setting up templates or automating your product layout workflow?
? Book a setup session with the Printcart team
? Explore the Printcart community for advanced layout tips
Netbase
This quote has stayed with me throughout my journey—especially as I built Printcart from the ground up.
I'm David, CEO of Printcart, a division of Netbase JSC, and I’ve dedicated the past 15 years to transforming the Web-to-Print and Print-on-Demand (POD) industry. My goal from the beginning has been clear: to help printing businesses around the world scale through automation, personalization, and smart technology.
Before Printcart, I spent years consulting and launching web-to-print platforms for printers of all sizes—from local shops to global enterprises. That experience taught me to ask the right questions:
How can we reduce manual steps for printers and let them focus on growth?
What tools do customers need to personalize and place their orders effortlessly?
How can we make the Web2Print journey smoother, faster, and more profitable?
At Printcart, we combine AI, cloud-based automation, and a plug-and-play customization engine to bring that vision to life. But more than features, we care about outcomes—helping our clients deliver better user experiences, close more deals, and scale sustainably.
I’m always open to new ideas and feedback from the community. If you’re exploring how to evolve your print business or launch a new eCommerce venture with Web2Print capabilities, feel free to connect directly.
Let’s talk growth.
? Email: project@printcart.com
? Website: https://printcart.com