How to Build a Profitable Web2Print Store on WordPress with Printcart
So, in this article, we are officially providing a completely free lite version of NBdesigner. Click the "Get Now" button to get our free package
- By Lynn Jones
- 4682 views
- 0 reply

TABLE OF CONTENTS
TABLE OF CONTENTS
Related Post

Breton Print stands out as a premier full-service printing establishment, renowned for its unwavering commitment to delivering outstanding printing solutions. Whether it's posters, flyers, business cards, booklets, brochures, invitations,...

Overall of Shopify Shopify is a robust e-commerce platform that enables entrepreneurs and businesses to create and manage their online stores with ease. Here's an overview of its key features...

Overall of WIX What is WIX? Wix is a leading website building platform that empowers individuals and businesses of all sizes to create stunning, professional websites with ease. With its user-friendly...
Other Usefull Contents
You can see many success stories from our customers, and you may be one of them in the future

The pandemic has forced many furniture stores to shut their shops and as such it has become hard for anyone who wants to furnish their homes. Interior design software counter this by letting you design, create and choose the furniture you want which you can later buy from the online markets or offline stores of your choice.
Read More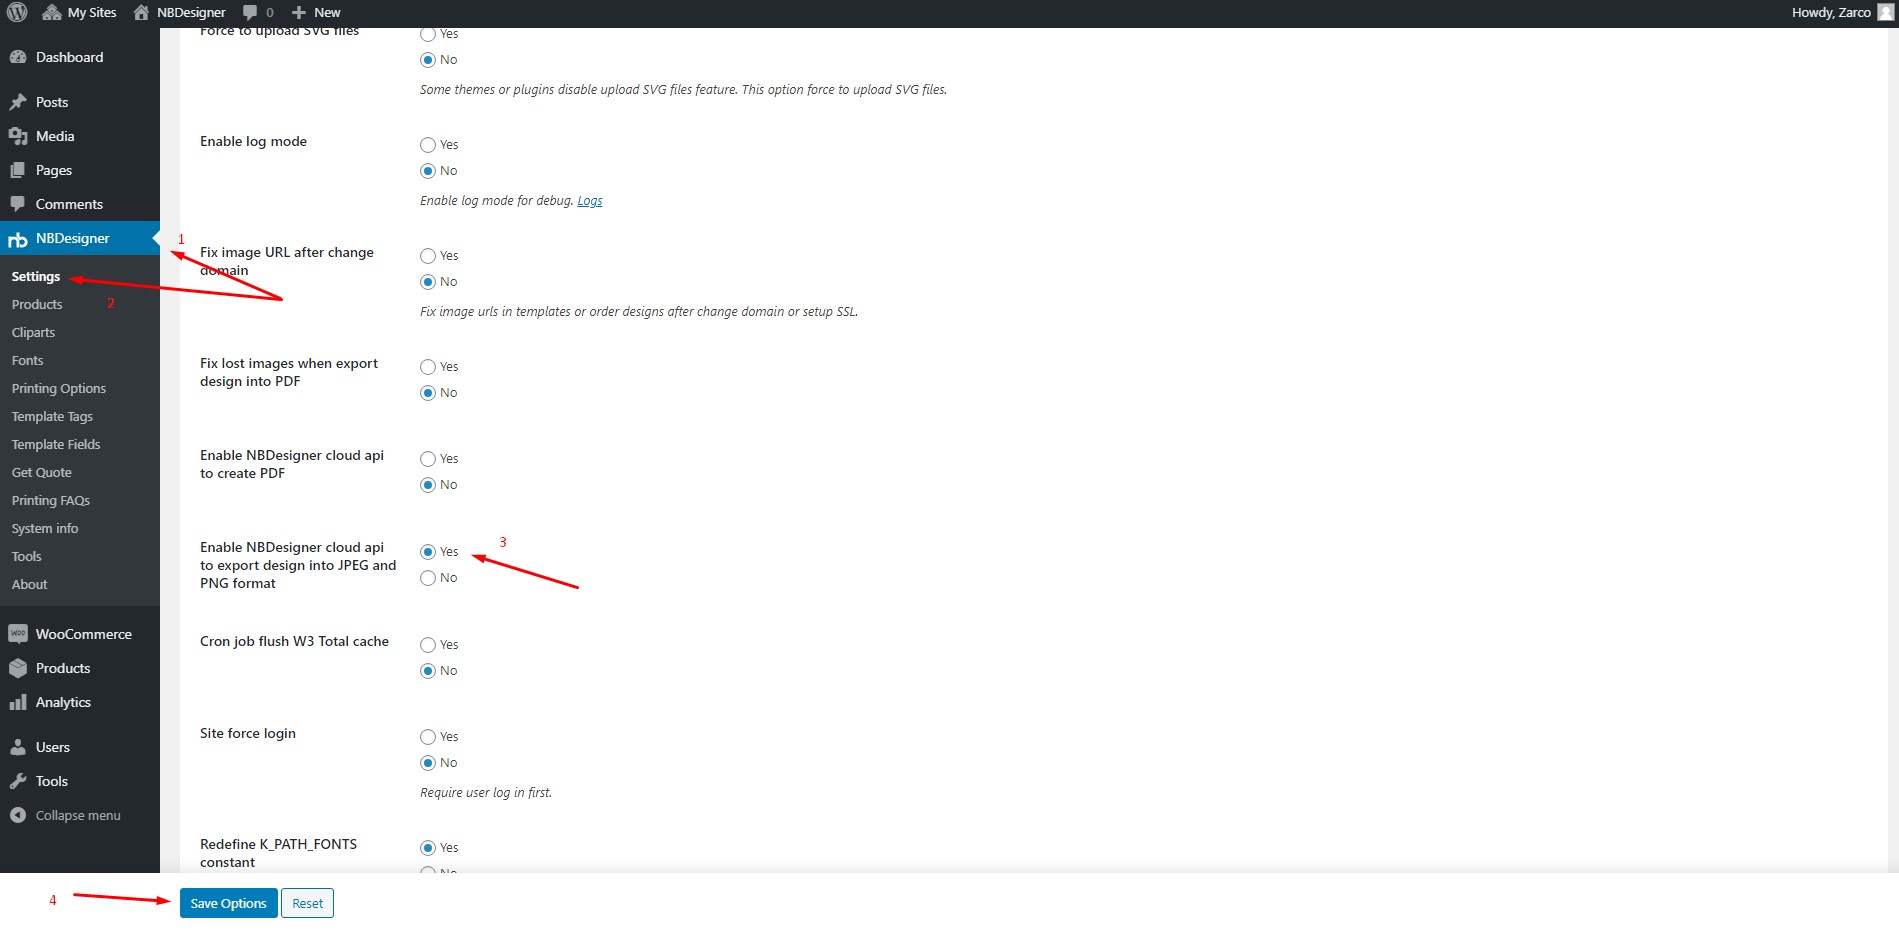
Currently, The Demand For Printing On Demand Is A Global Trend, But For Current Online Design Services, When Customers Design A Product And Order. You Want To Refer Back To Those Product Samples So You Can Have Your Own Development Inspiration.
Read More
What format do you usually use for your online design files? Usually, you will think of two formats as JPG or PNG. So besides the two basic formats above, what file formats can you use for online design?
Read More


The printing industry is undergoing a digital transformation—and at the heart of it lies Web2Print, a model that empowers customers to design, personalize, and order printed products directly from your website. Whether you're running a print-on-demand shop, a custom t-shirt business, or a full-scale print agency, Web2Print streamlines operations, enhances customer experience, and opens up new revenue opportunities.
What is Web2Print
Web2Print, also known as remote publishing or online print ordering, refers to an eCommerce-enabled printing workflow that allows customers to:
Key features of Web2Print
Choose a print product (e.g., business cards, t-shirts, mugs)
Customize it using a browser-based design editor
Preview the final result
Place orders directly on your website
Once an order is placed, the system generates print-ready files and sends them directly to fulfillment or in-house production.
Why WordPress is the ideal Web2Print platform
As of 2025, WordPress powers over 43% of all websites on the internet (source). With its plugin flexibility, low setup cost, and WooCommerce ecosystem, WordPress is the most accessible platform for launching a Web2Print business.
WooCommerce as your ecommerce foundation
WooCommerce turns your WordPress site into a full-fledged eCommerce store. It's free, widely supported, and integrates perfectly with Printcart's Web2Print tools. You'll get:
Product inventory control
Order & shipping automation
Payment gateways (Stripe, PayPal, etc.)
Coupon, tax, and delivery tools
Learn more about WooCommerce
Printcart plugin as the engine for customization
When you add the Printcart WooCommerce Product Designer plugin to your WordPress site, it becomes a live design studio for customers. Shoppers can:
Upload logos and images
Add text, QR codes, clipart, and icons
Preview their design in real-time
Download files or request a quote
View the official Printcart Designer Plugin
Benefits of using WordPress for Web2Print
Key print-on-demand trends for WordPress users
Industry statistics and projections
The global print-on-demand market is expected to reach $39.49B by 2031, growing at 26.1% CAGR (source).
Custom t-shirts remain the most profitable POD category—WordPress users can easily sell these using Printcart’s t-shirt builder.
68% of print buyers prefer businesses that offer self-service design tools online (source).
Web2Print empowers print businesses to operate online at scale—and WordPress is the smartest platform to do it. With WooCommerce for commerce and Printcart for design automation, you can:
Launch a store in days (not months)
Offer premium design experiences
Eliminate design back-and-forth
Grow revenue with upsells, personalization, and automation
Next up: Why Printcart is the best plugin for WooCommerce Web2Print users
Why Printcart is the best plugin for WooCommerce Web2Print users
Choosing the right Web2Print plugin is critical for any WordPress-based print store. Printcart stands out as the most robust and feature-complete solution for WooCommerce users in 2025. With deep customization tools, seamless print file generation, and scalable pricing systems, Printcart helps you transform your website into a dynamic online print business.
Designed specifically for WooCommerce
Unlike generic design plugins, Printcart was built from the ground up to integrate natively with WooCommerce. This means every design, upload, and print-ready file is tightly connected to your product, cart, and order system.
Design editor embeds directly into WooCommerce product pages
Customers can customize before adding to cart
Admin receives design previews in order management panel
All-in-one online designer features
Printcart provides a full suite of customization features:
Drag-and-drop design interface
300 DPI output for print accuracy
Real-time previews (including 3D)
Advanced upload controls (PDF, AI, SVG, PSD)
Pre-built templates per product type
See full demo with screenshots
Flexible for all business models
Whether you're building a store for:
Single-vendor custom printing
Print-on-demand drop shipping
Bulk B2B personalization
Multi-vendor print marketplaces
Printcart has workflows for each. You can enable design uploads, request quotes, configure tiered pricing, or allow vendors to create their own designs using the vendor design feature.
Scalable pricing and automation tools
Printcart makes it easy to grow with:
Measurement-based pricing (e.g., per cm² for banners)
Bulk variation pricing (e.g., 100 mugs with 3 color options)
Automated file handling (e.g., export SVG, PNG, PDF per order)
Delivery cost matrix
Explore pricing logic in action
Built-in conversion tools
Printcart isn't just about design—it helps you close more sales:
Instant design preview in cart
Download file before ordering (optional)
Quote request for large orders
Upsell templates and add-ons
Summary of key plugin benefits
Next up: Printcart Plugin Installation and Setup on WordPress
Printcart plugin installation and setup on WordPress
To start using Printcart's Web2Print functionality on your WordPress site, you need to install the plugin, connect your API license, import prebuilt templates, and configure the design editor for WooCommerce products. This setup enables your customers to create personalized print designs and submit orders with print-ready files. Below is a complete walkthrough with updated UI and screenshots.
Install the Printcart Plugin
The Printcart plugin is available for free in the WordPress plugin repository and can be installed in just a few clicks.
Go to your WordPress admin dashboard.
Navigate to Plugins > Add New.
Search for Printcart Integration.
Click Install Now, then Activate.
Once activated, the plugin adds product customization capabilities to your WooCommerce store, such as the ability for customers to upload artwork, personalize designs, and preview products.
Connect to Printcart Cloud and activate your API license
After activation, your store must be linked to the Printcart Cloud platform to access designer functionality and manage licensing.
Navigate to PC Designer > General > Connect
Log in using your Printcart account credentials
The system will automatically generate your Store name, Store URL, SID, Secret Key, and Token
Click Import Products to pull in demo templates
This connection ensures your store is fully authenticated and capable of retrieving templates, saving customer designs, and syncing orders to the Printcart cloud dashboard.
Import pre-configured print products
To speed up onboarding, Printcart provides a library of pre-configured sample products with layout settings, price calculators, and demo templates already assigned.
Available sample products include:
Business cards
Flyers
Mugs
T-shirts
Banners
Stickers
Door hangers
Simply check the products you want to import and click Connect.
This action will automatically add them to your WooCommerce catalog with sample images, assigned design areas, and demo pricing.
Configure general settings
Navigate to the General Setup tab. These global settings define how your design editor behaves sitewide:
Dimension unit: Select from cm, mm, inches, feet, or pixels. This determines the unit used for calculating design area sizes.
Output DPI: Recommended setting is 300 DPI for high-quality print resolution.
Language: Choose your designer language interface. Printcart supports over 20 languages including Arabic, Japanese, Korean, Hebrew, and more.
These settings ensure consistent print quality and an accessible interface for your international customers.
Assign default Printcart pages
Printcart requires several key pages to be defined in order for the customer workflow to function correctly:
Designer page: Where customers edit their designs
Gallery page: Where saved designs are listed
Upload page: For uploading custom artwork
Request a quote page: For B2B or bulk orders
You can choose from existing pages in the dropdown, or create new ones on the fly. These pages will be linked automatically in the designer flow.
Assign editor to WooCommerce product
Once the plugin and system pages are configured, the next step is to enable customization on specific products.
Go to Products > All Products in WordPress.
Click Edit on the product you want to make customizable.
Scroll down to the NBDesigner Settings meta box.
Enable:
Enable Design – activates the editor for this product
Enable Upload Design – allows customers to upload their own files
Enable Upload Without Design – useful for bulk orders
Set:
Print area width and height
DPI resolution
Safe zone and bleed margin
Optionally assign a pre-made template
These settings allow you to control how much creative freedom a user has and ensure their design meets printing requirements.
Final checklist after installation
Once these steps are completed, your WordPress store is Web2Print-ready and capable of offering real-time design customization to customers.
Next up: How to Set Up Your Product Designer for Customization and Print Accuracy
How to set up your product designer for customization and print accuracy
With the Printcart plugin installed and configured, the next critical step is optimizing the product designer experience for both usability and production quality. This includes defining design zones, setting safe areas, assigning templates, uploading branding assets, and ensuring accurate print output.
Configure canvas dimensions and DPI
Navigate to PC Designer > Settings > General to define global defaults. Then, per product, go to Product > Edit > NBDesigner Settings:
Design Width & Height: This determines the editable print area. Match this to the actual printable size.
Measurement Unit: Set globally (cm, mm, in, px, ft).
Output DPI: Always set to 300 DPI for production-grade quality.
Define safe zones, bleed, and layout visuals
Go to PC Designer > Settings > Appearance and enable visual guides:
Show bleed, Safe zone, and Grid
Product dimensions, Layer dimensions, and Out of stage warnings
These help your customers stay within printable boundaries, especially for edge-to-edge artwork.
Use prebuilt or custom templates
Navigate to PC Designer > Products to assign pre-built templates:
Select from cloud-based template library
Upload your own branded designs
Enable multi-side templates (e.g., front/back of business cards)
Useful for:
Branded postcard or flyer layouts
Corporate ID card templates
T-shirt print zones
Upload custom fonts and clipart
Add custom branding assets to your designer:
Fonts: Upload OTF/TTF files under PC Designer > Fonts
Cliparts: SVG/PNG image assets grouped by category
You can also manage and categorize cliparts for seasonal campaigns, industries, or product types.
Configure upload settings for design files
In Settings > Upload Design:
Enable formats:
.jpg, .pdf, .ai, .psd, .svg, .epsSet upload limits (e.g., max file size = 100MB)
Enable social integrations (upload via Facebook, Dropbox, Google Drive)
This allows both casual users and enterprise clients to submit complex designs.
Enable live design preview and rendering
In Settings > Output:
Choose watermark settings (text/image)
Enable PDF password protection if needed
Auto-export to storage (Dropbox, Google Cloud, FTP)
This helps automate backend file management and protects IP.
Activate quote system and B2B mode
For B2B or bulk pricing:
Enable Request a Quote tab under Settings
Hide "Add to Cart" for those products
Show quote request in checkout or gallery
You can also enable PDF quote generation, reCAPTCHA on form, and automated email attachments.
Manage advanced pricing options
Printcart supports matrix-based pricing, price per area, and quantity tiers. Go to:
Settings > Printing Options to configure:
Table pricing (quantity-based)
Decimal precision
Enable/disable price summaries
Final best practices checklist
Test your end-to-end workflow
Create or edit a product with design enabled
Set canvas and assign template
Upload files and preview design
Place a test order and verify output
Your product designer is now fully configured for flexible design input, real-time preview, and backend automation.
Next up: Creating Print-Ready Products: Real Examples for Business Cards, T-Shirts, Mugs, and Stickers
Creating print-ready products: Real examples for business cards, t-shirts, mugs, and stickers
To truly harness the power of Printcart on WordPress + WooCommerce, let’s walk through real-world examples for configuring customizable products. Each example below includes canvas setup, editor configuration, and output considerations for four top-selling print product categories.
Business Cards
Business cards remain a top staple of any print service. Offering editable business card templates makes your site appealing to professionals and small business owners.
Recommended settings:
Size: 3.5 x 2 inches (standard US)
DPI: 300 DPI
Sides: Front and back templates
Safe Zone: 0.125 inches inside edges
Bleed: 0.125 inches
Printcart configuration:
Use double-sided template
Lock text fields for name, role, contact info
Upload brand templates for design consistency
T-Shirts
T-shirts are ideal for on-demand personalization. You can offer clipart, custom slogans, or even client-uploaded photos.
Recommended settings:
Size: Printable area of 12 x 16 inches
DPI: 300 DPI
Safe Zone: 0.5 inch inward
Bleed: Not necessary
Printcart configuration:
Enable front/back printing
Add smart rulers, 3D preview, and layer control
Offer category-based templates (birthday, graduation, funny, etc.)
Mugs
Mugs are curved surface products and require special layout settings. Printcart makes this possible with real-time 3D preview.
Recommended settings:
Canvas: 20 x 8 cm
DPI: 300 DPI
Safe Zone: 1 cm from top/bottom
Bleed: Optional depending on printing method
Printcart configuration:
Enable curved product mockup preview
Offer clipart/stickers library
Use center alignment guides
Stickers
Stickers come in custom shapes, so precision and outline handling are key.
Recommended settings:
Size: Variable (e.g., 5 x 5 cm)
DPI: 300 DPI
Bleed: 2–3 mm
Output format: SVG + transparent PNG
Printcart configuration:
Enable outline layer and SVG path export
Use shape masks (circle, star, rectangle)
Auto-check image resolution warning
Summary comparison
By using these examples as a baseline, you can quickly create new products with high-converting customization experiences, optimized for real-world printing workflows.
Next up: Streamlining Orders and File Output for Production Teams
Streamlining orders and file output for production teams
Once customers start placing personalized orders, it's essential to streamline how those designs are reviewed, approved, and delivered to your production or fulfillment workflow. Printcart helps automate this process through its admin order dashboard, export tools, and integrations with cloud storage and email systems.
Order management overview
Each order that includes a custom design will appear in your WooCommerce admin under Orders, with an attached file preview and downloadable links.
Go to WooCommerce > Orders
Click any order with design enabled
Scroll to the Printcart Designer Order Data section
You’ll find:
Customer design preview
Download links (PDF, SVG, PNG)
Design ID for reference
This ensures your fulfillment team sees exactly what the customer submitted.
Enable file automation and delivery sync
To avoid downloading and sorting files manually, you can configure Printcart to export and deliver files to remote systems.
Steps:
Go to PC Designer > Settings > Output
Enable Auto export design to PDF when order status changes
Select export condition (Completed, Processing, etc.)
Choose output method:
FTP or SFTP server
Dropbox
Google Cloud Storage
Amazon S3
Add your credentials (path, token, key) and test connection.
This setup lets your files sync instantly to your production server or cloud backup.
Order notifications and approval workflow
Printcart includes order status notifications to help coordinate between customers, admins, and printers.
Options include:
Enable admin and customer email notifications
Attach generated design files (PDF, SVG) to the order email
Include thumbnails and previews inside the WooCommerce order view
You can also allow customers to re-download designs under My Account > Downloads, or restrict access depending on product rules.
Add watermark or password-protect design files
To protect your templates or watermark customer designs until payment:
Go to Output Settings > Watermark
Choose image or text watermark
Enable password-protected PDFs
This is useful for B2B quotes or bulk ordering where payment terms are involved.
Bulk file management tips
If you’re managing hundreds of orders per day:
Use Printcart’s design ID as a unique order reference
Integrate with Zapier or n8n to automate file transfers
Set output folders by date or order ID for sorting
Recommended file export settings
Summary
By automating design file delivery, syncing with cloud systems, and configuring print-ready outputs, Printcart significantly reduces time and errors in the production process. Your team can focus on what matters: delivering perfect prints on time.
Next up: Advanced Use Cases: Vendor Uploads, Quote Requests, and Template Marketplaces
Advanced use cases: Vendor uploads, quote requests, and template marketplaces
Beyond standard product customization, Printcart unlocks powerful workflows for multi-vendor stores, B2B quote automation, and scalable template monetization. This section walks through advanced configurations for maximizing functionality.
Enable vendor uploads and designer storefronts
If you run a marketplace where multiple designers or print providers upload and sell their designs, Printcart includes built-in tools to support this.
Steps to activate:
Go to PC Designer > Settings > Designers
Enable Designer Store: This allows users to become vendors
Set commission type: Flat or Percentage
Define withdrawal rules: Minimum, threshold, order status
Customize banner height/width for each designer’s storefront
Designers can now upload templates, create custom products, and track earnings inside WordPress.
Set up request-a-quote workflows for B2B
Printcart includes a full quoting module for businesses handling complex or bulk print orders. This is ideal for:
Event printing
Corporate stationary
Custom large-format jobs
Key options:
Enable Request a Quote from the settings tab
Hide “Add to Cart” for quote-only products
Use reCAPTCHA for spam protection
Send quote PDFs to email + allow downloads from user dashboard
You can also set up auto-email templates to notify users and sales staff when quotes are submitted, approved, or converted into orders.
Launch a template marketplace
Want to turn your Printcart-powered store into a passive income source? Let users purchase and customize premium design templates.
Configuration:
Upload branded templates in PC Designer > Templates
Set visibility: Public, Private, or Role-based (e.g., Premium members only)
Assign templates per product
Add pricing logic if using downloadable format
Users can:
Browse gallery of pre-designed items
Click “Use Template” to open editor
Customize, preview, and order
This workflow is ideal for:
Greeting cards
Marketing flyers
Resume designs
Posters and signage
Integrate with vendors and third-party systems
Advanced users can connect Printcart with external CRMs, vendor dashboards, and analytics systems using:
Webhooks
Zapier/n8n workflows
REST API (Printcart license required)
Example use cases:
Auto-send quote to Salesforce when submitted
Add custom product to Monday.com upon order
Trigger notification in Slack for new designer uploads
Summary
These advanced use cases turn Printcart into a full Web2Print platform capable of serving:
Designers
Print partners
Bulk B2B clients
Marketing teams
With just a few additional settings, your store can support a full ecosystem of vendors, customers, and content contributors.
Next up: Optimizing for Performance, SEO, and Mobile UX
Optimizing for performance, SEO, and mobile UX
To maximize visibility and conversions, your Printcart-powered store must be fast, search-friendly, and mobile-optimized. This section shows how to configure your WordPress + WooCommerce setup to support top-tier UX and SEO while handling the complex dynamic features of online product customization.
Improve site speed and performance
Design editors and preview generators can add weight to your frontend. Here’s how to maintain high performance:
Speed tips:
Use caching plugins like WP Rocket or LiteSpeed Cache
Minify CSS/JS files (especially Printcart libraries)
Lazy-load images and disable unused media previews
Host product templates on a CDN if possible
Use fast WooCommerce hosting (e.g., SiteGround, Cloudways)
Ensure SEO-friendly product and editor pages
WooCommerce and Printcart work well with SEO plugins like Rank Math and Yoast SEO. But customized product pages must be optimized manually.
SEO checklist:
Optimize permalinks and slugs: Use product keywords
Add meta titles + descriptions for all design-enabled products
Use alt-text on template previews and product mockups
Link from homepage or blog to customizable product pages
Rich snippet support:
In Printcart > Printing Options, enable Rich Snippet Price
Show structured data even for quote-based products
Customize mobile design UX
Most Printcart users start designing on mobile or tablet. Responsive UX ensures they can preview, upload, and checkout smoothly.
Mobile UX enhancements:
Use Printcart’s Modern Layout (responsive by default)
Hide bulky tabs like Typography or Layer Tools on small screens
Enable auto-scroll and zoom pinch gestures
In PC Designer > Settings > Appearance, toggle off options like:
Show grid by default
Layer dimensions
Warning popups (on mobile)
Configure template loading speeds
Reduce the number of template sides shown in the gallery
Compress template preview images (JPG at 80% quality)
Set template visibility to role-based to avoid overloading free users
Core Web Vitals for product customization pages
Run PageSpeed Insights or GTMetrix tests on:
Product detail pages with editor enabled
Editor page URLs
Checkout with attached design preview
Optimize for:
LCP (Largest Contentful Paint) under 2.5s
CLS (Cumulative Layout Shift) under 0.1
FCP (First Contentful Paint) under 1.8s
Summary
By applying best practices in speed, mobile UX, and SEO metadata, you ensure your Web2Print store isn’t just functional—it’s discoverable, responsive, and high-converting.
Next up: Upgrading to Full Store and Premium Plan: What You Unlock
Upgrading to Full Store and Premium Plan: What You Unlock
If you're ready to scale your WordPress Web2Print business beyond the basics, upgrading to the Printcart Full Store Package or Premium Subscription unlocks powerful capabilities tailored for growth, automation, and professional branding.
What’s included in the Full Store Package?
The Full Store Package is an all-in-one, done-for-you eCommerce solution built on WordPress + WooCommerce, fully configured with:
Key inclusions:
Custom branded storefront with your logo, colors, and fonts
Pre-configured sample products (e.g. business cards, t-shirts, mugs)
Design editor fully installed and integrated
Pricing calculators, quote requests, and upload-only options pre-enabled
1-on-1 onboarding and training session
Premium Subscription features
For $29/month, the Premium plan enhances your store with:
Features unlocked:
Access to cloud design template library
Unlimited media storage for customer uploads
API access for automation and external app integration
Real-time collaboration and design monitor tools
Priority email and ticket support
View Printcart API and Premium App
Exclusive Premium benefits
Free custom UI/UX design service (limited time)
Direct chat with account managers (not just ticketing)
Free hosting for 3 months
Unlimited developer support for integrations, custom fields, or layout extensions
These benefits eliminate the need to hire external developers and speed up deployment.
Full ownership and scalability
Unlike SaaS-based POD platforms like Shopify or Wix, Printcart’s WordPress Full Store setup gives you:
100% source code access
No monthly app fees
Full control over SEO, performance, and security
The ability to migrate, scale, or add features as needed
Upgrade paths and options
Summary
Upgrading to Printcart’s Full Store or Premium Subscription plan helps you:
Launch faster with preconfigured designs
Enhance trust with premium UI/UX
Automate processes through APIs
Get direct support and onboarding
Next up: Final Tips: Scaling Your Web2Print Store and Staying Competitive
Final tips: Scaling your Web2Print store and staying competitive
Once your Web2Print store is live and functional, the real journey begins—growing your audience, increasing order volume, improving margins, and standing out in a crowded market. Here are strategic tips and tools to help you scale sustainably and remain competitive.
Focus on niche markets
Don't try to serve everyone. Instead, specialize:
Local businesses: Business cards, signage, stickers
Events: Wedding invitations, save-the-dates, custom banners
Creators: Merch, photobooks, wall art
Corporate: Employee ID kits, letterheads, internal signage
Tailored templates and marketing language help boost trust and relevance.
Use analytics to track behavior and sales
Integrate with tools like:
Google Analytics + Enhanced eCommerce
Hotjar or Microsoft Clarity (for heatmaps)
WooCommerce reporting
Printcart’s own designer usage stats (via Premium plan)
Track:
Product design starts vs. completions
Time spent in editor
Which templates convert best
Which SKUs have the highest reorder rate
Automate your email marketing
Use WooCommerce integrations with:
Mailchimp
Klaviyo
MailPoet (native WordPress plugin)
Set up:
Abandoned design reminders
Post-purchase product suggestions
Template showcase for new categories
Test and optimize checkout flow
Cart abandonment is common, especially for customized products. Simplify the flow:
Auto-add design to cart after completion
Enable guest checkout
Reduce form fields with autofill plugins
Show trust badges, delivery timelines, and return policies
Offer subscription or bundle pricing
Create packages:
Business Stationery Pack (Cards + Letterhead + Envelopes)
T-Shirt Club: 1 new shirt/month for 6 months
Photo Print Subscriptions
Use WooCommerce plugins for:
Subscriptions (by WooCommerce)
Bundles (Product Bundles plugin)
Dynamic Pricing
Stay ahead with Printcart upgrades
Regularly check for new product demos on Printcart Demo Hub
Join the Printcart Community to learn from other print store owners
Attend webinars and product updates for training
Summary
Scaling a Web2Print business isn’t about adding more plugins—it’s about optimizing every touchpoint: from design creation to order delivery. By focusing on automation, UX, customer retention, and targeted niches, you can build a profitable and sustainable print business on WordPress.
Now it's your turn—start designing, start selling, and grow your print empire with Printcart.
Lynn Jones
One of my favorite quotes is: "Strive not to be a success, but rather to be of value" - Albert Einstein.
I graduated from foreign trade university majoring in Economics. However, it took me 5 years to find my passion for Digital Marketing. With over 5-years research and over 3-years practical work experience, I am confident that I can easily what problems your website is facing and suggest the best solution for your business.
I used to be an accountant, a salesperson, a banker even a receptionist. However, I just feel to be myself when I choose to be a Marketer, especially an SEOer. I have spent a lot of time studying and learning about marketing tools like Google Analytics, Google Search Console, Ahref, Alexa, Similar Web, ... In order to understand customer behavior as well as to make a website to be on the top rank on the search tool.
"Content is king". Where advertising is about the sale, content marketing is about establishing a connection. The best content marketing will lure people to your brand and keep them coming back for more.
So let’s explore the wide world of ever-increasing content, and investigate how you ensure your message is well delivered to your target customers.